
第 7 章:FastAPI 异步接口与阻塞调用
前面我们已经把“学生信息查询助手”写成了普通 Python 异步脚本。
它已经能做这些事:
- 使用
httpx.AsyncClient请求外部 HTTP 接口。 - 同时请求学生基础信息、课程信息和积分信息。
- 使用
Semaphore控制外部请求并发数量。 - 对查询不到、HTTP 错误、超时做基础处理。
但是现在它还有个问题:
它只能在命令行里运行,前端或其他系统不能直接访问它。
真实后端项目里,我们通常希望提供一个接口:
GET /students/1/summary程序收到请求后,再异步请求外部学生服务、课程服务和积分服务,最后把聚合结果返回给前端。
本章要解决 4 个问题:
- FastAPI 接口函数什么时候适合写
async def? - 如何在 FastAPI 接口中等待上一章的异步 HTTP 聚合函数?
async def接口里写time.sleep()、requests.get()这类阻塞代码会有什么问题?- 如果项目里暂时必须调用同步阻塞函数,如何用
asyncio.to_thread()做最小处理?
本章只解决 FastAPI 异步接口的日常够用写法。
本章不讲数据库、Redis、Queue、复杂依赖注入、ASGI 原理、生产部署和性能压测。
本章学习目标
学完本章后,应该能做到:
- 能写出一个最小 FastAPI 异步接口。
- 能用
uvicorn启动 FastAPI 应用。 - 能通过浏览器或
curl访问接口。 - 能在 FastAPI 接口中使用
await调用异步函数。 - 能把上一章的学生 HTTP 聚合逻辑放进 Web 接口。
- 能复用
httpx.AsyncClient,避免每个请求都新建客户端。 - 能使用
asyncio.Semaphore继续限制外部 HTTP 请求并发数量。 - 能识别
time.sleep()、requests.get()这类阻塞代码。 - 能使用
asyncio.to_thread()处理少量必须保留的同步阻塞函数。 - 能说清楚
asyncio.to_thread()是兜底方案,不是首选方案。
学生信息服务的接口场景
当前学生信息查询助手的核心逻辑大概是这样:
result = await fetch_student_summary(client, student_id, semaphore)这段代码已经可以异步请求外部接口,并返回学生聚合信息。
现在我们要把它放进 FastAPI:
浏览器 / 前端
    ↓
GET /students/{student_id}/summary
    ↓
FastAPI 异步接口
    ↓
await fetch_student_summary(...)
    ↓
外部学生服务 / 课程服务 / 积分服务可以用一个直观的全景拓扑图表示网关的扇出聚合与弹性容灾管道:
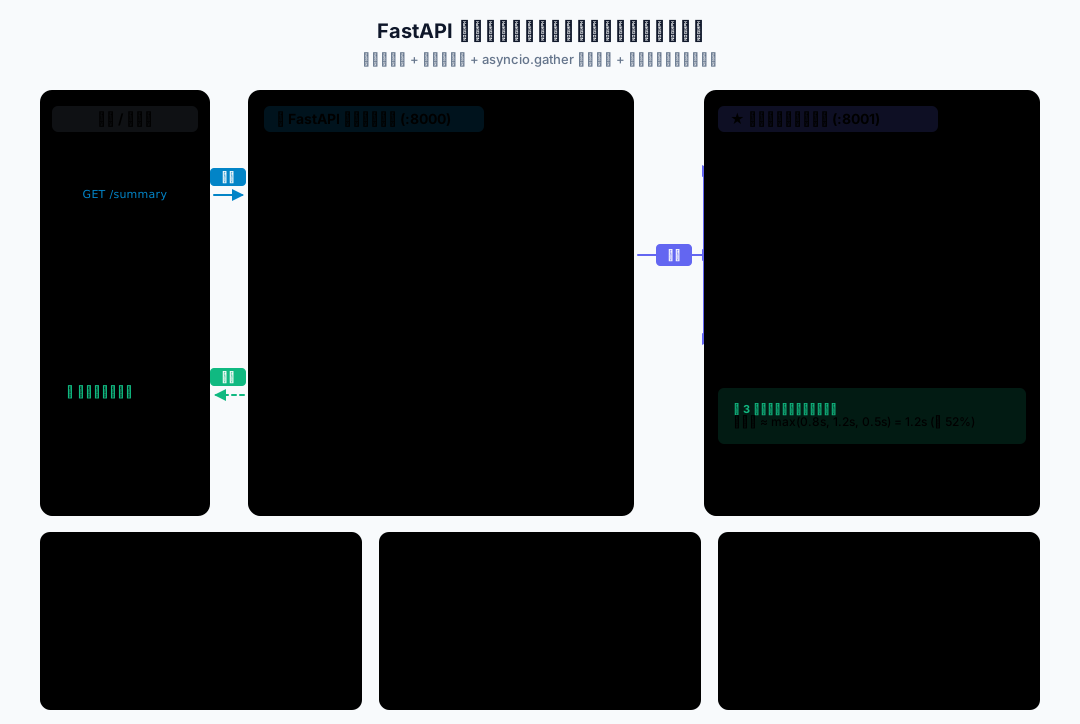
注意:本章重点不是 FastAPI 的完整体系,而是把异步 I/O 正确放进接口里。
异步接口与同步调用
下面每一步的完整代码都直接显示在页面里。将代码按标注文件名保存到本地 _code_async/c07_fastapi_async_and_blocking/,然后在 _code_async 目录执行命令。
1. 最小 FastAPI 异步接口
异步接口的等待方式
FastAPI 支持这样写接口:
@app.get("/health")
async def health():
return {"status": "ok"}这里的 async def 表示这个接口函数是异步函数。
它适合做什么?
适合等待异步 I/O,例如:
await asyncio.sleep(...)await client.get(...)await fetch_student_summary(...)- 后续章节里的异步数据库查询
- 后续章节里的异步 Redis 操作
容易误用在哪里?
不要以为函数前面写了 async def,里面所有代码都会自动变快。
如果在里面写同步阻塞代码,例如:
time.sleep(2)
requests.get(url)它仍然会卡住当前事件循环,影响同一个进程中的其他异步请求。
同步接口与异步接口的执行方式
FastAPI 也支持普通同步接口:
@app.get("/sync-demo")
def sync_demo():
return {"message": "sync"}够用理解:
- 接口内部主要是同步代码,可以写
def。 - 接口内部要
await异步 I/O,就写async def。 - 在
async def里,不要直接调用耗时的同步阻塞函数。
FastAPI 调用普通 def 路由时,会把它放在线程池中执行;async def 路由则在事件循环中执行。但在异步路由里直接调用自己写的普通辅助函数,例如 load_student_from_old_system(1),仍是在当前线程执行,FastAPI 不会自动把这个调用移入线程。已有异步 I/O 又需要调用同步阻塞辅助函数时,可以使用后面的 asyncio.to_thread()。具体区别见 FastAPI 并发说明。

FastAPI 负责启动和运行异步路由。路由内部直接 await 异步函数,不再调用脚本入口的 asyncio.run()。
本课程后面主要关注异步项目,所以优先使用 async def。
阻塞事件循环
阻塞事件循环可以先简单理解为:
一个请求在异步接口里执行了同步等待,导致同一个事件循环里的其他异步任务也没机会继续推进。
典型错误:
@app.get("/demo")
async def demo():
    time.sleep(2)
return {"ok": True}这段代码看起来在 async def 里,但 time.sleep(2) 是同步阻塞等待。
正确方向是:
@app.get("/demo")
async def demo():
    await asyncio.sleep(2)
return {"ok": True}真实项目里,如果是 HTTP 请求,优先用 httpx.AsyncClient,不要在异步接口里直接用 requests.get()。
需求:先写一个最小 FastAPI 应用,确认异步接口可以启动和访问。
功能分析:
- 使用
FastAPI()创建应用。 - 提供
/health健康检查接口。 - 提供
/students/{student_id}查询学生接口。 - 使用
await asyncio.sleep(0.2)模拟异步等待。 - 用
uvicorn启动服务。
文件名:01_fastapi_async_basic.py
import asyncio
from fastapi import FastAPI

app = FastAPI()


@app.get("/health")
async def health():
    return {"status": "ok"}


@app.get("/students/{student_id}")
async def get_student(student_id: int):
    await asyncio.sleep(0.2)

    return {
        "id": student_id,
        "name": "张三",
}安装依赖:
uv sync启动命令:
uv run python -m uvicorn 01_fastapi_async_basic:app --reload --app-dir c07_fastapi_async_and_blocking访问地址:
http://127.0.0.1:8000/health
http://127.0.0.1:8000/students/1也可以使用 curl:
curl http://127.0.0.1:8000/health
curl http://127.0.0.1:8000/students/1运行结果示例:
{
  "status": "ok"
}{
"id": 1,
"name": "张三"
}运行逻辑:
app = FastAPI()创建一个 FastAPI 应用对象。@app.get("/health")表示注册一个 GET 接口。@app.get("/students/{student_id}")表示从路径中读取student_id。student_id: int会把路径参数转成整数。async def get_student(...)是异步接口函数。await asyncio.sleep(0.2)模拟一个异步等待,不会阻塞事件循环。
注意:本章不是 FastAPI 系统课。这里先掌握异步接口的最小形态。
2. 同步等待对事件循环的阻塞
需求:很多同学会以为接口写成 async def 就一定不会阻塞。我们用两个接口对比一下。
功能分析:
/blocking/time-sleep故意在async def中写time.sleep(2)。/blocking/async-sleep使用await asyncio.sleep(2)。- 通过对比理解阻塞等待和异步等待的区别。
- 这里只做识别阻塞代码的演示,不做复杂压测。
文件名:02_blocking_code.py
import asyncio
import time

from fastapi import FastAPI

app = FastAPI()


@app.get("/blocking/time-sleep")
async def blocking_time_sleep():
    time.sleep(2)
    return {
        "message": "time.sleep 执行完成",
        "note": "这是反面示例,不推荐在 async def 接口中这样写",
    }


@app.get("/blocking/async-sleep")
async def non_blocking_async_sleep():
    await asyncio.sleep(2)
    return {
        "message": "asyncio.sleep 执行完成",
        "note": "这是异步等待,不会像 time.sleep 那样阻塞事件循环",
}启动命令:
uv run python -m uvicorn 02_blocking_code:app --reload --app-dir c07_fastapi_async_and_blocking访问地址:
http://127.0.0.1:8000/blocking/time-sleep
http://127.0.0.1:8000/blocking/async-sleep运行逻辑:
/blocking/time-sleep是反面示例。- 它虽然写在
async def里,但time.sleep(2)是同步阻塞等待。 - 同一个事件循环中,其他异步任务可能被它影响。
/blocking/async-sleep使用await asyncio.sleep(2)。- 它等待时会把执行权让出去,让其他异步任务有机会继续推进。
单独请求两个接口时,它们都会等约 2 秒,单次耗时不能证明是否阻塞。保持这个服务只运行一个工作进程,先让 /blocking/time-sleep 开始,再立即请求 /blocking/async-sleep,第二个请求会等前者释放事件循环;把前一个请求换成 /blocking/async-sleep 后,两段等待可以重叠。可用两个终端同时发请求,观察第二个请求的完成时间。
下面的客户端从 _code_async 目录运行。它先请求同步阻塞接口,等待 0.2 秒后再请求异步接口;随后重复两个异步接口的组合。查询服务须保持运行,并且只使用一个工作进程。若前一示例仍占用 8000 端口,先停止它再启动当前服务。
uv run python - <<'PY'
import asyncio
import time

import httpx


async def compare(client, first_path):
    start_time = time.perf_counter()
    first = asyncio.create_task(client.get(first_path))
    await asyncio.sleep(0.2)
    second = asyncio.create_task(client.get("/blocking/async-sleep"))
    responses = await asyncio.gather(first, second)
    for response in responses:
        response.raise_for_status()
    print(f"{first_path}:两个请求共 {time.perf_counter() - start_time:.2f} 秒")


async def main():
    async with httpx.AsyncClient(
        base_url="http://127.0.0.1:8000", timeout=10.0, trust_env=False
    ) as client:
        await compare(client, "/blocking/time-sleep")
        await compare(client, "/blocking/async-sleep")


asyncio.run(main())
PY第一组总耗时通常接近 4 秒,第二组接近 2.2 秒,后者包含了人为错开请求的 0.2 秒。网络与调度开销会产生轻微差异;若顺序不明确,可以结合终端 A 的访问日志核对。这个命令是验证用的独立客户端,因此使用 asyncio.run();服务端路由内部仍直接使用 await。

注意:
time.sleep()适合同步脚本里的简单暂停,不适合直接写进异步接口。- 异步接口中要重点检查同步 HTTP、同步数据库、大文件同步读写、CPU 密集计算。
- 如果是 HTTP 请求,优先换成
httpx.AsyncClient。 - 如果短期内不能换,再考虑
asyncio.to_thread()兜底。
3. 同步辅助函数的线程调用
有些项目短期内无法替换旧同步函数。例如旧系统 SDK 只提供同步函数:
def load_student_from_old_system(student_id):
    time.sleep(2)
return {"id": student_id}这时可以临时交给线程执行:
result = await asyncio.to_thread(load_student_from_old_system, student_id)to_thread() 避免这个同步等待直接卡住事件循环,适合少量 I/O 型同步阻塞代码。大量阻塞调用、CPU 密集计算或复杂任务调度,不要靠它硬撑。
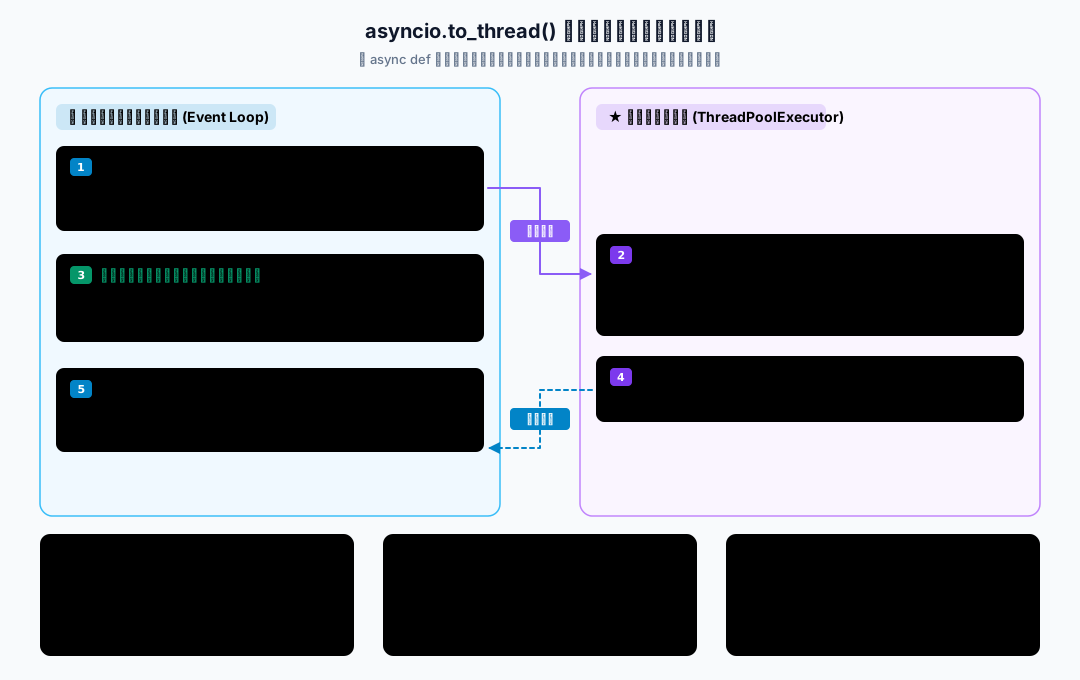
需求:有些老项目或第三方 SDK 只提供同步函数。短期内不能改成异步库时,不能直接在 async def 接口中调用它。
功能分析:
- 写一个普通同步函数
load_student_from_old_system()。 - 用
time.sleep(2)模拟旧系统同步阻塞调用。 - 在 FastAPI 异步接口中使用
await asyncio.to_thread(...)。 - 让同步阻塞函数放到线程里执行,避免直接卡住事件循环。
文件名:03_to_thread.py
import asyncio
import time

from fastapi import FastAPI

app = FastAPI()


def load_student_from_old_system(student_id: int):
    time.sleep(2)

    return {
        "id": student_id,
        "name": "旧系统学生",
        "source": "old_system",
    }


@app.get("/students/{student_id}/old-system")
async def get_student_from_old_system(student_id: int):
    result = await asyncio.to_thread(
        load_student_from_old_system,
        student_id,
    )

return result启动命令:
uv run python -m uvicorn 03_to_thread:app --reload --app-dir c07_fastapi_async_and_blocking访问地址:
http://127.0.0.1:8000/students/1/old-system运行结果示例:
{
  "id": 1,
  "name": "旧系统学生",
  "source": "old_system"
}运行逻辑:
load_student_from_old_system()是普通同步函数。- 它内部使用
time.sleep(2)模拟同步阻塞调用。 - 如果在
async def接口里直接调用它,会阻塞事件循环。 await asyncio.to_thread(load_student_from_old_system, student_id)会把这个同步函数放到线程里执行。- 接口仍然可以用
await等它完成。
验收时在客户端同时请求 /students/1/old-system 和 /students/2/old-system,确认两个结果的 ID 分别为 1、2,总耗时接近 2 秒。如果把 await asyncio.to_thread(...) 改成直接调用同步函数,两个查询通常会顺序占用事件循环,总耗时接近 4 秒。
复用前面的客户端验证命令,将其中的 main() 替换为下面的函数,保留原有导入和最后的 asyncio.run(main()):
async def main():
    async with httpx.AsyncClient(
        base_url="http://127.0.0.1:8000", timeout=10.0, trust_env=False
    ) as client:
        start_time = time.perf_counter()
        responses = await asyncio.gather(
            client.get("/students/1/old-system"),
            client.get("/students/2/old-system"),
        )
        for response in responses:
            response.raise_for_status()
        ids = [response.json()["id"] for response in responses]
        assert ids == [1, 2]
print(f"学生 ID:{ids},总耗时:{time.perf_counter() - start_time:.2f} 秒")注意:
asyncio.to_thread() 是兜底方案,不是首选方案。
真实项目更推荐:
- HTTP 请求:优先使用
httpx.AsyncClient。 - 数据库访问:优先使用异步数据库客户端。
- Redis 访问:优先使用异步 Redis 客户端。
- 少量暂时无法替换的同步 I/O 函数:可以临时用
to_thread()包一层。
不要把 to_thread() 当成所有性能问题的解决方案。
4. FastAPI 学生信息聚合接口
现在我们把上一章的异步 HTTP 聚合逻辑放进 FastAPI。
本案例会提供:
GET /health
GET /students/{student_id}/summary外部学生服务、课程服务、积分服务继续作为单独启动的本地服务存在。这样这一章和第 6 章保持同一条请求链路。
在普通脚本里,HTTP 客户端可以由 async with 管理。到了 FastAPI 应用中,如果每个请求都新建客户端,会增加连接创建成本。这里用 lifespan 在应用启动时创建共享客户端,在关闭时释放:
@asynccontextmanager
async def lifespan(app: FastAPI):
    async with httpx.AsyncClient() as client:
        app.state.client = client
yieldapp.state 保存应用级共享对象;本案例还用它保存 app.state.semaphore。这里只把它作为客户端和限制器的存放位置,不展开复杂配置管理。
这些对象在当前应用进程的多个请求之间共享。若启动多个工作进程,每个进程都会创建自己的客户端和限制器;一个进程的 5 个名额不代表所有进程合计只有 5 个名额。本章验证使用单个工作进程,不展开部署配置。
完整代码用客户端上下文管理关闭,即使生命周期退出时发生异常,也会执行客户端的关闭流程。启动时打印创建提示,请求过程中不会重复创建;正常停止服务时打印关闭提示,可据此核对创建与释放。
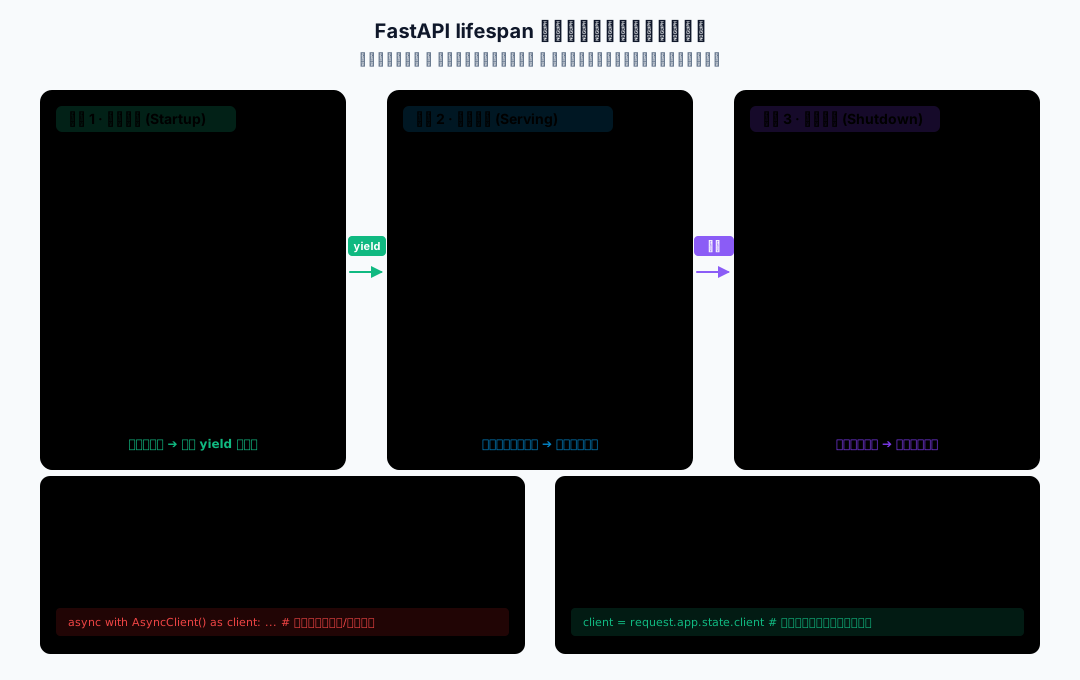
项目结构:
_code_async/c07_fastapi_async_and_blocking/
├── 01_fastapi_async_basic.py
├── 02_blocking_code.py
├── 03_to_thread.py
└── 04_fastapi_student_summary/
    ├── main.py
└── student_api_server.py安装依赖:
uv sync文件名:main.py
import asyncio
from contextlib import asynccontextmanager

import httpx
from fastapi import FastAPI

BASE_URL = "http://127.0.0.1:8001"


async def fetch_json(
    client: httpx.AsyncClient, url: str, semaphore: asyncio.Semaphore
):
    async with semaphore:
        response = await client.get(url)

    if response.status_code == 404:
        return None

    response.raise_for_status()
    return response.json()


async def fetch_student_profile(
    client: httpx.AsyncClient, student_id: int, semaphore: asyncio.Semaphore
):
    url = f"/students/{student_id}/profile"
    return await fetch_json(client, url, semaphore)


async def fetch_student_courses(
    client: httpx.AsyncClient, student_id: int, semaphore: asyncio.Semaphore
):
    url = f"/students/{student_id}/courses"
    return await fetch_json(client, url, semaphore)


async def fetch_student_points(
    client: httpx.AsyncClient, student_id: int, semaphore: asyncio.Semaphore
):
    url = f"/students/{student_id}/points"
    return await fetch_json(client, url, semaphore)


async def fetch_student_summary(
    client: httpx.AsyncClient,
    student_id: int,
    semaphore: asyncio.Semaphore,
):
    try:
        results = await asyncio.gather(
            fetch_student_profile(client, student_id, semaphore),
            fetch_student_courses(client, student_id, semaphore),
            fetch_student_points(client, student_id, semaphore),
            return_exceptions=True,
        )
        for result in results:
            if isinstance(result, BaseException):
                raise result
        profile, courses, points = results

        if profile is None:
            return {
                "student_id": student_id,
                "ok": False,
                "reason": "not_found",
                "data": None,
            }

        missing = []
        if courses is None:
            missing.append("课程")
        if points is None:
            missing.append("积分")
        if missing:
            return {
                "student_id": student_id,
                "ok": False,
                "reason": "incomplete_data",
                "data": None,
                "message": f"{'、'.join(missing)}接口返回 404",
            }

        return {
            "student_id": student_id,
            "ok": True,
            "reason": "success",
            "data": {
                "profile": profile,
                "courses": courses,
                "points": points,
            },
        }

    except asyncio.CancelledError:
        raise
    except httpx.TimeoutException:
        return {
            "student_id": student_id,
            "ok": False,
            "reason": "timeout",
            "data": None,
        }
    except httpx.HTTPError as exc:
        return {
            "student_id": student_id,
            "ok": False,
            "reason": "http_error",
            "data": None,
            "message": str(exc),
        }


@asynccontextmanager
async def lifespan(app: FastAPI):
    async with httpx.AsyncClient(
        base_url=BASE_URL, timeout=3.0, trust_env=False
    ) as client:
        app.state.client = client
        app.state.semaphore = asyncio.Semaphore(5)
        print("创建共享 HTTP 客户端和并发限制器")
        try:
            yield
        finally:
            print("结束共享资源使用,准备关闭 HTTP 客户端")
    print("共享 HTTP 客户端已关闭")


app = FastAPI(lifespan=lifespan)


@app.get("/health")
async def health():
    return {"status": "ok"}


@app.get("/students/{student_id}/summary")
async def get_student_summary(student_id: int):
    client = app.state.client
    semaphore = app.state.semaphore

    result = await fetch_student_summary(
        client=client,
        student_id=student_id,
        semaphore=semaphore,
    )

return result配套的学生接口也要保存到同一个案例目录:
import asyncio

from fastapi import FastAPI, HTTPException

app = FastAPI()

student_profiles = {
    1: {"id": 1, "name": "张三", "age": 18},
    2: {"id": 2, "name": "李四", "age": 19},
    3: {"id": 3, "name": "王五", "age": 20},
}

student_courses = {
    1: ["Python 基础", "Web 后端"],
    2: ["数据分析", "SQL 入门"],
    3: ["异步编程", "接口开发"],
}

student_points = {
    1: 95,
    2: 88,
    3: 91,
}


def ensure_student_exists(student_id: int):
    if student_id not in student_profiles:
        raise HTTPException(status_code=404, detail="student not found")


@app.get("/students/{student_id}/profile")
async def get_student_profile(student_id: int):
    ensure_student_exists(student_id)
    return student_profiles[student_id]


@app.get("/students/{student_id}/courses")
async def get_student_courses(student_id: int):
    ensure_student_exists(student_id)
    return {"courses": student_courses.get(student_id, [])}


@app.get("/students/{student_id}/points")
async def get_student_points(student_id: int):
    ensure_student_exists(student_id)

    if student_id == 3:
        await asyncio.sleep(2)

return {"points": student_points.get(student_id, 0)}启动命令需要两个终端,均从本地 _code_async 目录开始。先停止前面的演示服务,释放 8000 端口。
先确认 8001 端口的学生服务已启动,再访问 8000 端口的聚合服务;否则聚合接口无法取得外部学生数据。
终端 A,启动学生服务:
uv run python -m uvicorn student_api_server:app --port 8001 --app-dir c07_fastapi_async_and_blocking/04_fastapi_student_summary终端 B,启动聚合服务:
uv run python -m uvicorn main:app --port 8000 --app-dir c07_fastapi_async_and_blocking/04_fastapi_student_summary访问地址:
http://127.0.0.1:8000/health
http://127.0.0.1:8000/students/1/summary
http://127.0.0.1:8000/students/404/summary使用 curl:
curl http://127.0.0.1:8000/health
curl http://127.0.0.1:8000/students/1/summary
curl http://127.0.0.1:8000/students/404/summary正常学生返回示例:
本章保留三个外部接口返回对象的结构:data.courses 是包含 courses 列表的对象,data.points 是包含 points 数值的对象。第 6 章脚本把它们展平成列表和数值;这里改为保留原响应对象,便于观察 Web 聚合接口的 JSON 层级。
{
  "student_id": 1,
  "ok": true,
  "reason": "success",
  "data": {
    "profile": {
      "id": 1,
      "name": "张三",
      "age": 18
    },
    "courses": {
      "courses": [
        "Python 基础",
        "Web 后端"
      ]
    },
    "points": {
      "points": 95
    }
  }
}不存在学生返回示例:
{
  "student_id": 404,
  "ok": false,
  "reason": "not_found",
  "data": null
}运行逻辑:
- 应用启动时,
lifespan()会创建共享AsyncClient。 app.state.client保存共享 HTTP 客户端。app.state.semaphore保存共享并发限制器。- 请求
/students/{student_id}/summary时,接口函数取出共享客户端和限制器。 - 接口中使用
await fetch_student_summary(...)等待异步聚合结果。 fetch_student_summary()内部继续用asyncio.gather()同时请求三类学生信息。Semaphore继续限制外部 HTTP 请求并发数量。- 应用关闭时,退出
async with,由客户端上下文管理器关闭共享客户端。 - 基础信息存在,但课程或积分返回 404 时,返回
ok=false, reason="incomplete_data",不再将缺失信息标为成功;message指明缺失接口。
本章继续把基础信息接口的 404 转成 not_found,HTTPX 超时转成 timeout;其余 HTTP 错误统一使用 http_error,未保留第 6 章的细分状态错误类别。课程接口返回空列表仍是成功结果,与接口返回 404 不同。本例正常返回的 HTTP 状态为 200,业务查询是否成功由 JSON 中的 ok 和 reason 表示。
注意:
- 这里继续沿用第 6 章的本地学生服务,重点是 FastAPI 如何调用异步聚合逻辑。
- 真实项目里,
AsyncClient会请求真实服务地址。 - 不要每个请求都创建一个新的
AsyncClient。 - 不要在接口里直接使用
requests.get()代替httpx.AsyncClient。
接口选型与资源复用
async def 的适用场景
适合:
- 接口内部要请求异步 HTTP 服务。
- 接口内部要访问异步数据库。
- 接口内部要访问异步 Redis。
- 接口内部要等待多个异步 I/O 结果。
- 接口逻辑能用
await串起来。
不适合:
- 接口内部全是同步阻塞库。
- 接口内部主要做 CPU 密集计算。
- 只是为了“看起来高级”把所有接口都改成
async def。 - 写了
async def,但内部仍然大量使用time.sleep()、requests.get()、同步数据库驱动。
异步接口的阻塞代码检查
写异步接口时,重点检查这些代码:
time.sleep()
requests.get()
同步数据库查询
同步 Redis 操作
大文件同步读写
长时间 CPU 计算
第三方同步 SDK处理方向:
- 能换异步库,优先换异步库。
- 少量无法替换的同步 I/O,可以用
asyncio.to_thread()兜底。 - CPU 密集任务不要靠
to_thread()简单解决,要另行设计。 - 大型项目不要把所有逻辑塞进一个接口函数。
HTTP 客户端的生命周期
推荐:
应用启动时创建
AsyncClient
请求过程中复用
AsyncClient
应用关闭时关闭
AsyncClient避免:
每个请求里临时创建
AsyncClient
创建后不关闭
在多个地方散落创建客户端本章用 lifespan + app.state 是为了教学清晰。真实项目可以进一步结合依赖注入、配置管理和模块拆分,但本章先不展开。
本章小结
本章我们把异步学生信息查询助手从普通脚本放进了 FastAPI 接口。
本章最重要的是 5 件事:
- FastAPI 可以使用
async def编写异步接口。 async def接口适合等待异步 I/O。- 不要在异步接口里直接写
time.sleep()或requests.get()。 httpx.AsyncClient在 FastAPI 应用中应该尽量复用。- 少量无法替换的同步阻塞函数,可以用
asyncio.to_thread()兜底。
现在我们已经能通过:
GET /students/{student_id}/summary查询学生聚合信息。
练习
练习 1:启动 02_blocking_code.py,执行正文的并发验证命令。检查两组总耗时是否分别接近 4 秒和 2.2 秒;保持一个工作进程,避免多个进程掩盖阻塞现象。
练习 2:停止阻塞演示服务,启动 03_to_thread.py。将正文验证客户端的 main() 改为同时请求 /students/1/old-system 和 /students/2/old-system,不再错开请求;保留状态检查与计时。确认返回 ID 为 1、2,耗时接近 2 秒。再把服务端的线程调用改为直接执行同步函数,待服务重新加载后重复验证,观察耗时接近 4 秒;最后恢复 to_thread()。
练习 3:启动完整案例的两个服务,连续请求两次 /students/1/summary。确认共享客户端的创建提示只在聚合服务启动时出现一次,两个响应都成功;按 Ctrl+C 正常停止聚合服务,确认出现“共享 HTTP 客户端已关闭”。
练习 4:在完整案例的 fetch_student_courses() 中,把 /courses 改成 /courses_missing,重新启动聚合服务后请求 /students/1/summary。确认返回 ok=false, reason="incomplete_data",data 为 null,并提示“课程接口返回 404”;恢复地址并重启后,确认成功响应恢复。